An Extremely Dangerous Article About Noise Reduction In Audacity
Hey there!
This one’s going to be long-ish, with a lot of warnings and bolded and capital letters.
I have some trepidation in even writing this article, because the subject matter, noise reduction, is rife with controversial aspects.
Why?
You can completely destroy a high-quality (but, perhaps a bit noisy) voice work session by applying noise reduction in a heavy-handed or incorrect way.
Having said that, noise reduction can be an effective final option for making your audio sound amazingly pristine, and is especially useful in audiobook work that you might be producing for your ACX projects. Here’s how.
Can I use Audacity for this?
Absolutely, and in fact, I’m only going to be showing you how to use the Noise Reduction effect in Audacity. If you have a similar method for appropriately applying noise reduction in your favorite audio editing software, and you’re confident that it produces great results, feel free to tell us about it in the comments below.
And despite all my histrionics and warnings, rest assured, if you follow the process below to the letter, and once your settings are adjusted properly, you should get great results every time: nice noise-free audio, with no audible changes in your voice’s sound.
But…
Heed this warning.
Either with what I show you here, or what anyone posts in the comments with regard to their favorite software, BE EXTRAORDINARILY CAREFUL and until you have demonstrated to yourself and to your clients that your use of this process yields great results, ONLY WORK ON COPIES OF YOUR ORIGINAL ***RAW*** AUDIO. DO NOT USE THIS PROCESS ON YOUR LEVELATED AND NORMALIZED AUDIO. You can alter the sound of your actual voice if you aren’t careful, as the noise you want to remove from your audio has certain qualities that overlap with, and also might be removed from, the very voice performance you want to preserve and “de-noise.”
I am making clear, before I get into the nitty-gritty, that if you try to reduce noise in your audio and it comes out sounding horrible, neither I nor any of the commenters are in any way responsible for such a tragedy. Because the settings can be finicky, and because the slightest deviation from what works can damage the quality of the final audio, there are NO GUARANTEES of success.
Clear?
Awesome.
A last resort.
And, before we talk about noise reduction and how I apply it to my work (when needed), please remember that noise reduction should not be used until you’ve exhausted every other avenue in making your space quiet. That includes your recording location, any wall or window treatments, turning off lights and appliances and heaters and air conditioners, removing pets and humans from your space and spaces nearby, moving to the country or a mountaintop…everything. And I mean everything.
Why use noise reduction?
So, why would we want to apply noise reduction at all, if there is such a risk of making the final audio sound even worse?
Applied appropriately, noise reduction can lower your noise floor to extraordinarily quiet levels (-60 and below), which is what ACX, in particular, demands for your final work.
How does noise reduction work?
So, what is this noise reduction effect exactly? Noise reduction is basically a two-step process:
[dropcap]1[/dropcap]You “sample” the noise you want to remove by highlighting a section of room noise in your recording. We’ll show you how below.
[dropcap]2[/dropcap]You then apply the noise reduction process (or “effect,” as it’s called in Audacity) to your entire recording. Audacity will then remove all of that matching noise throughout your recording, and will base its selective reduction on the sample you took in Step 1.
I’m going to need a visual aid here.
Let’s take a look at a graphic example.
Say you have a typical bag of m&ms, which is filled with all the common colors of m&ms inside. But, the rock band that’s coming to play in the arena you manage has made a demand in their contract that there be no brown m&ms in their dressing room’s bowl:
You need to remove the “noise” – the brown m&ms, and ONLY the brown m&ms – from appearing in the final version – the band’s bowl.
So, your first step is to identify what needs to be removed. Pouring them out on the table, you look for that noise, and you find one brown m&m:
That’s your “sample.” You compare it to the red ones and the blue ones and the green ones and the yellow ones, and you note how different it is.
Then, your next step is to look for all of the other m&ms that are brown, and remove them from the pile.
(And yes, the side benefit is that you get to keep all the brown m&ms. You’re welcome.)
Every time you identify a brown m&m and remove it from the group, you note the exact matching of the color – brown. Should you inadvertently select a red m&m…
…it won’t look the same as the other m&ms in your growing pile of “noise”. It doesn’t match your sample.
So, you put it back in the main pile, and take care not to remove any others like it.
In the end, you have removed all of the brown m&ms, leaving a pile full of anything but brown:
Then, said pile is transferred to the band’s bowl, and you’ve happily confiscated the brown ones for your own enjoyment. The band is happy, you are happy, and everyone is satisfied.


This may sound exceedingly simple, but some people have a tough time visualizing the process. To be precise in the analogy, the raw audio is the entire bag of m&ms, the noise is the brown m&ms that are removed and the final noise-free audio is the resulting pile of anything-but-brown m&ms.
Removal vs. Reduction
What’s the difference between noise removal and noise reduction?
Not much, actually. But they are different.
Our m&ms example actually is noise removal, or 100% noise reduction. Should you miss a few brown m&ms in a big bowl, you’ve reduced, but not completely removed, all of the noise.
Even though the effect in Audacity is called Noise Reduction… the net effect is all audible noise being removed from the final file.
Here’s how to actually do it.
So…now that you have a sweet visual of how this works, how do you use this to make your audio “brown-m&ms-free?”
Well, here’s how I use Noise Reduction, step by step. And again, please experiment on COPIES of your raw audio.
SECOND WARNING: ONLY WORK ON COPIES OF YOUR ORIGINAL ***RAW*** AUDIO. DO NOT USE THIS PROCESS ON YOUR LEVELATED AND NORMALIZED AUDIO.
This process assumes you’ve been trained in my StairStep Method of editing, or at least know the difference between a raw recording and a processed one, the processing most often being both using Levelator and peak normalization of the Levelated file to -3.0 dB. Again, you want to do noise reduction PRIOR to any processing, and you want to do it on a COPY of that raw WAV file.
Cool? Awesome.
And stepping up to volunteer a piece of somewhat noisy audio is my lovely VO2GoGo Pro actor, singer and voice over talent, Christina Hourihan.
Christina sent me a piece of audio that had a slight bit of room noise underneath it. She’d done everything she could to make her space as quiet as possible environmentally, but still couldn’t identify and stamp out that last bit of room noise.
So, I applied the Noise Reduction… effect in Audacity, and it came out nice and quiet, with no change to how her voice sounded.
Here’s her original audio. Listen for two specific things (and you’ll want to use earbuds or headphones to listen, as the noise in your space may mask the actual amount of noise reduction): first, the way her voice sounds, and second, the room noise between her slate and audition and between her sentence fragments:
And here’s what it sounded like after I applied an appropriate amount of noise reduction. Again, listen to her voice (no discernible difference from the raw audio), and to where you heard room noise before:
Amazing, yes?
And very useful, especially for audiobook work.
So, how do I use Audacity to do this?
I’m going to show you step by step, and I’m also producing a video for our VO2GoGo Labs area so they can see the process actually working, and hear the difference in real time.
[dropcap]1[/dropcap] Record and edit your chapter, body, commercial, whatever. Always work on a COPY of the final version of what you’re voicing. If you have to make pickups later, you’ll want to work with the un-noise-reduced original, raw (un-Levelated), edited, exported WAV file.
THIRD WARNING: ONLY WORK ON COPIES OF YOUR ORIGINAL ***RAW*** AUDIO. DO NOT USE THIS PROCESS ON YOUR LEVELATED AND NORMALIZED AUDIO.
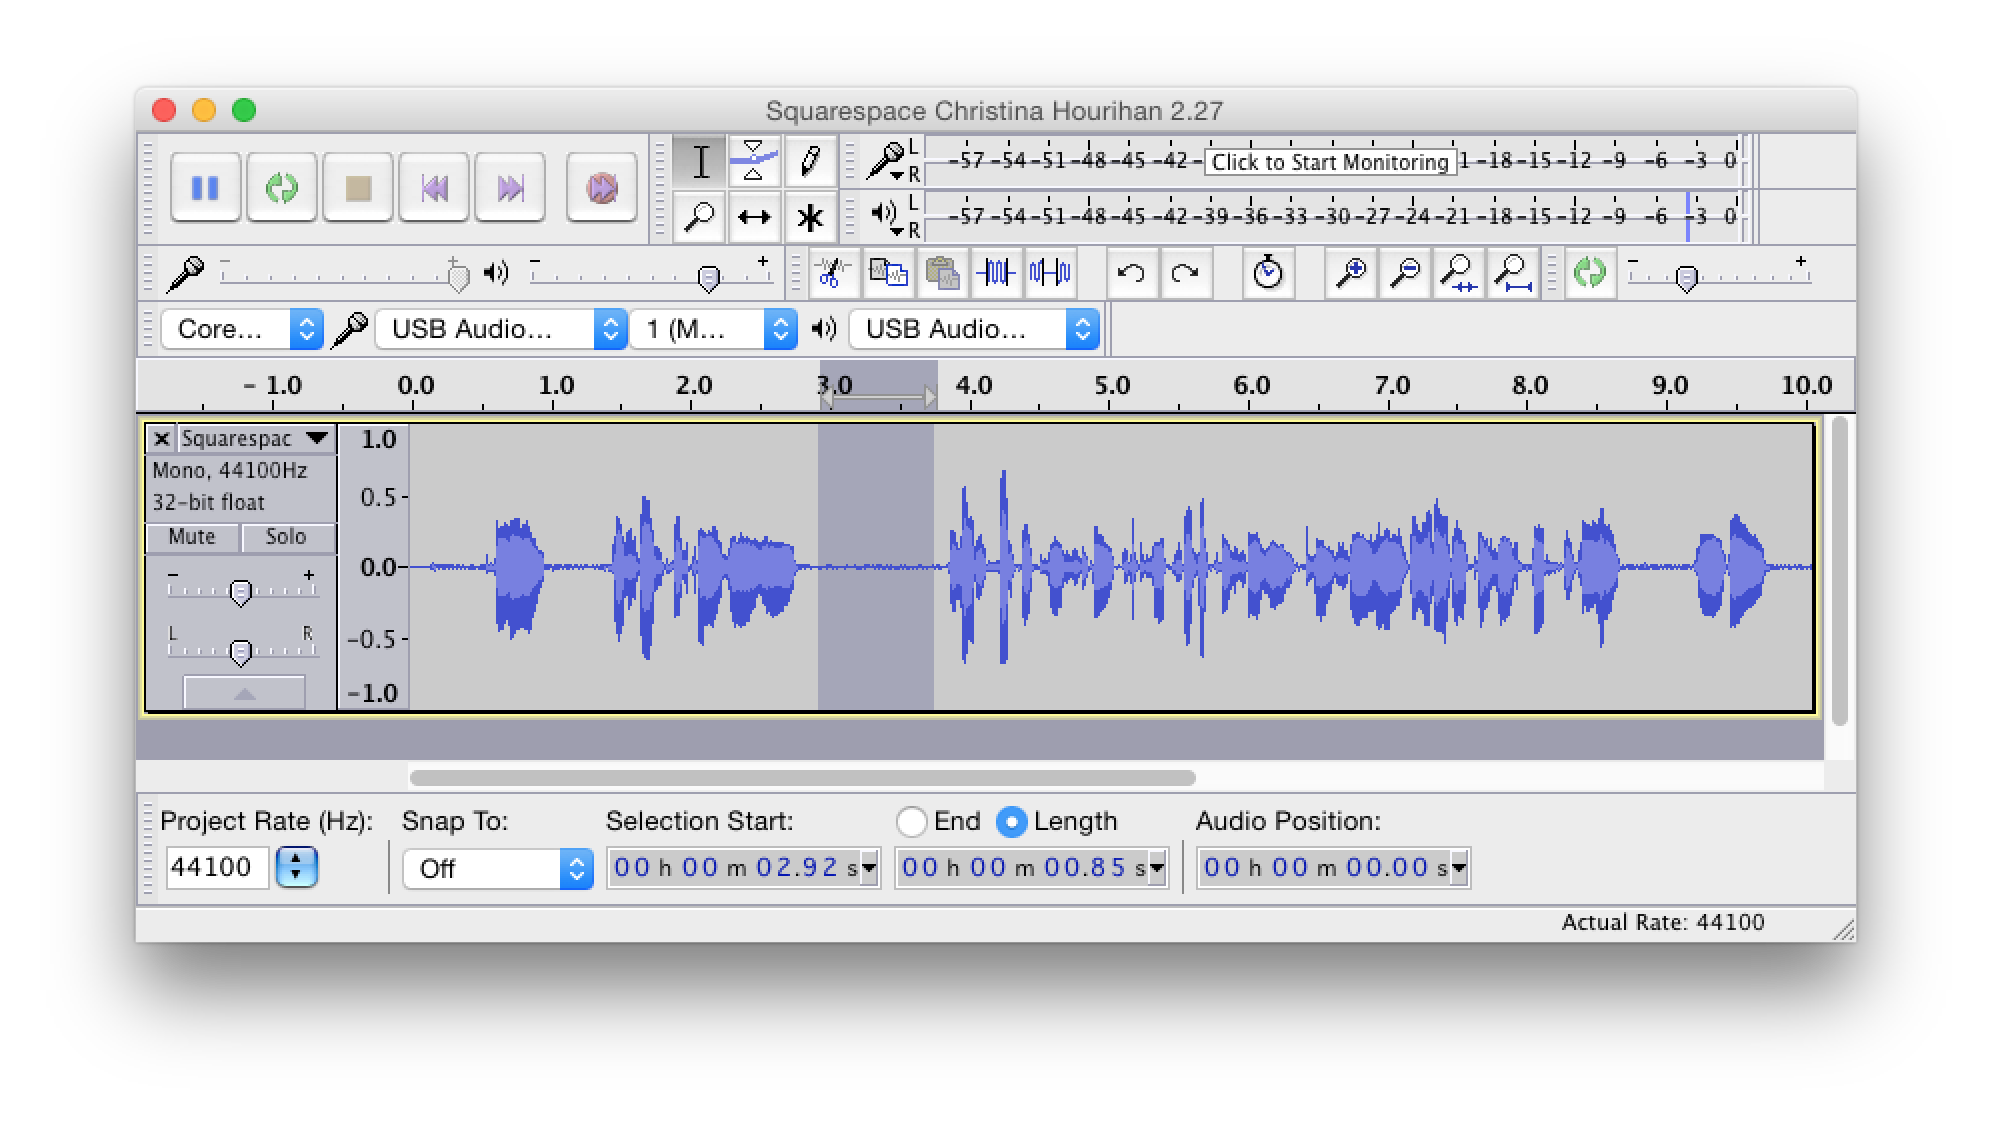
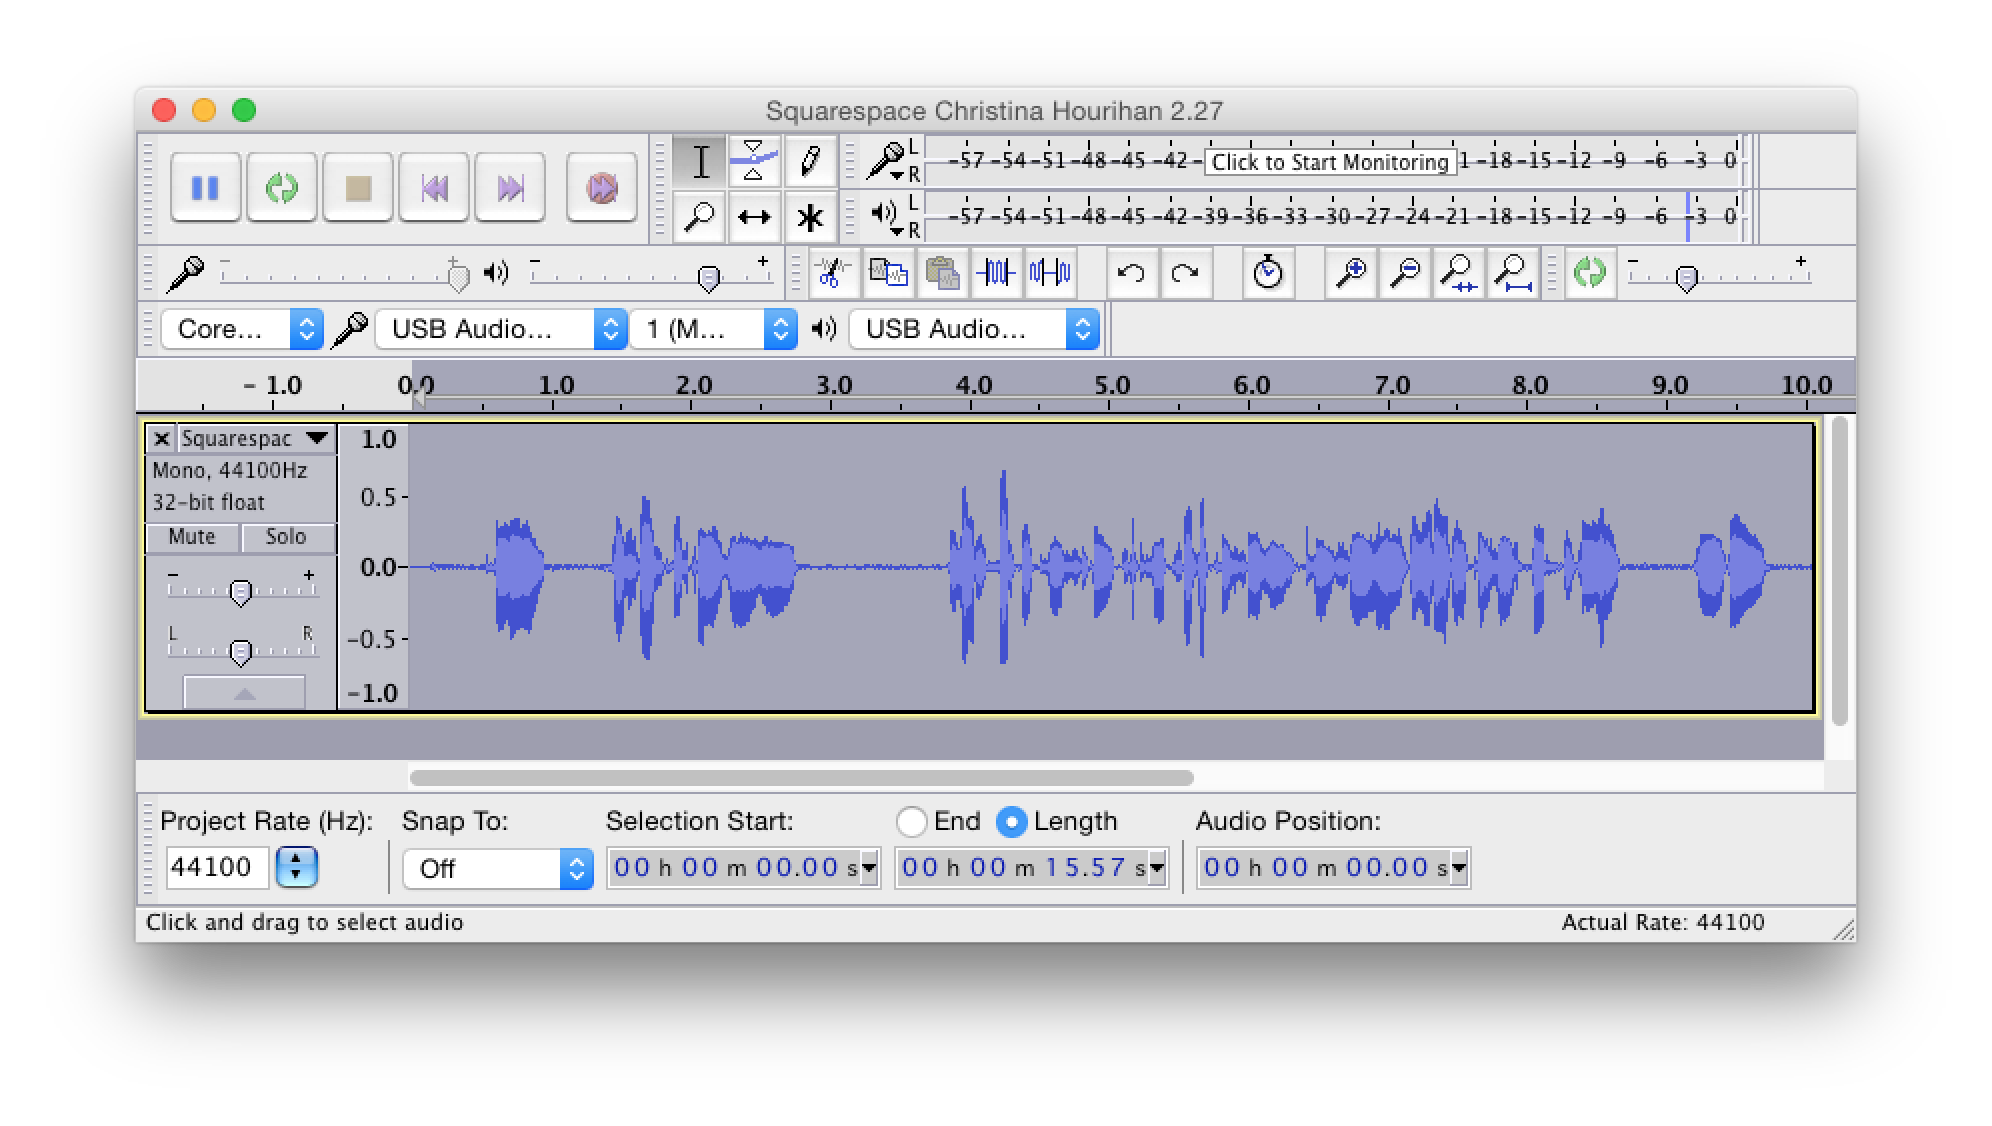
Here’s what Christine’s sample looked like in Audacity. She sent me the finished, edited WAV file, and this is the first ten seconds of it (click on the image to enlarge it):

Notice the noise between her slate and her audition, at around 3 seconds in:

When we’re finished, that’s going to be smooth as glass, and silent.
[dropcap]2[/dropcap] With your edited file open, highlight a room-noise-only section of your track, like you see above, being careful not to include any actual spoken content. This is what it will look like on your screen when properly highlighted (click on the image to enlarge it):
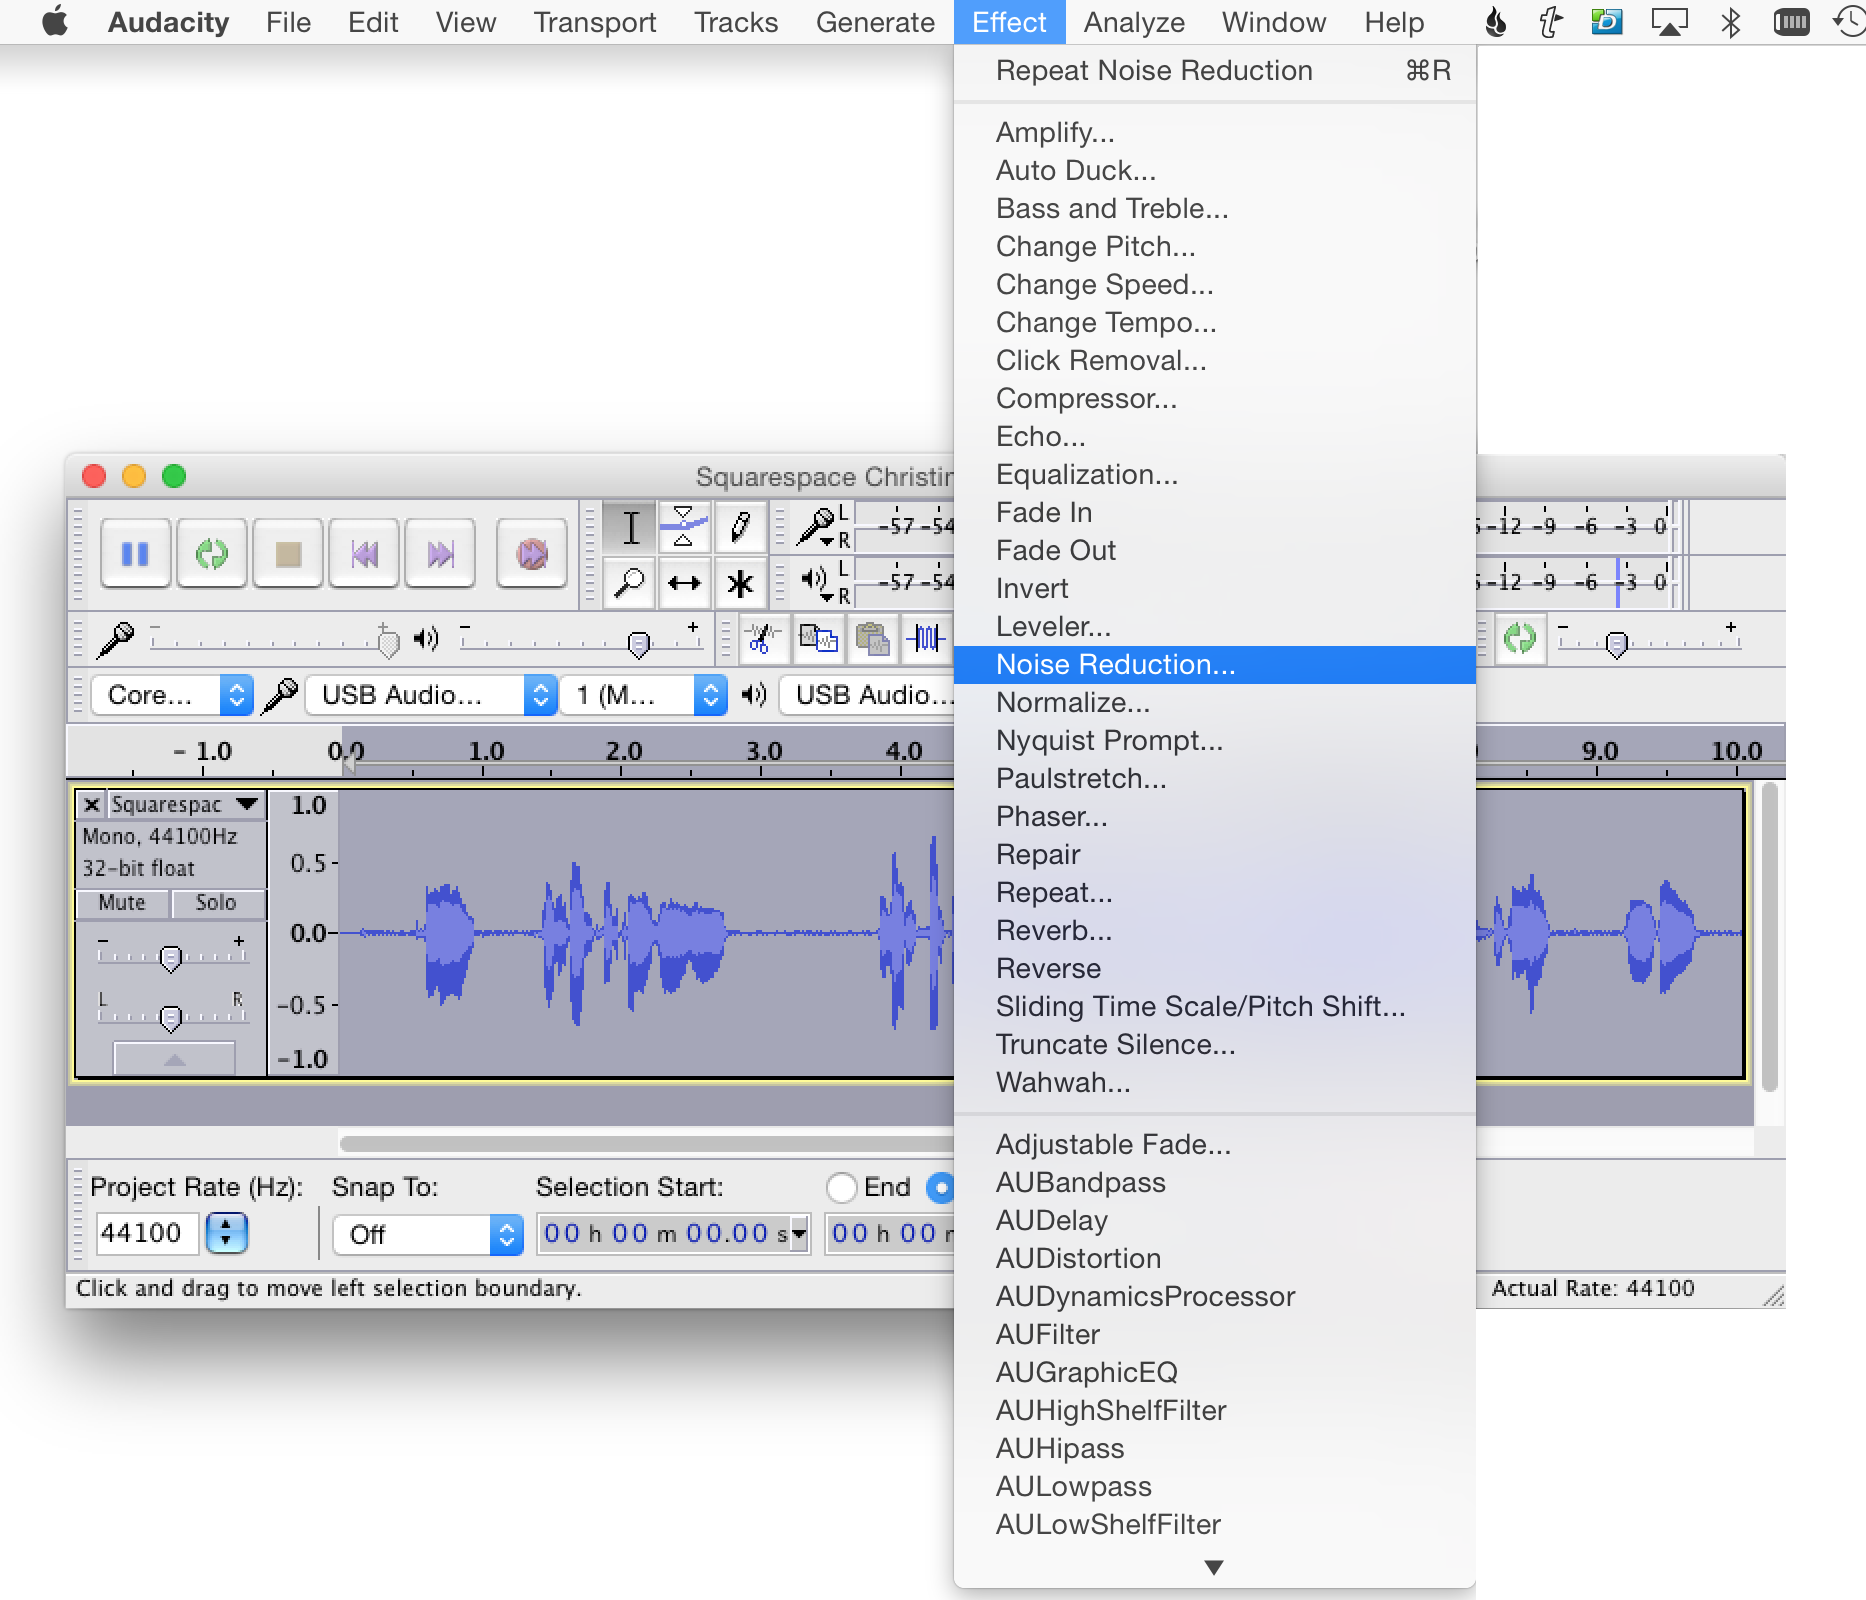
[dropcap]3[/dropcap] Go to the Effect menu in Audacity, and choose Noise Reduction… from the list. They are in alphabetical order, so look under the N’s (click on the image to enlarge it):
[dropcap]4[/dropcap] You’ll then see the Noise Reduction dialog box. It’s divided into two sections, and we’re going to use the top section in this step. All you have to do is click on Get Noise Profile. Audacity will then “listen” to the section of audio (room noise) that you’ve selected. Once you click on Get Noise Profile, the dialog box will go away. Rest assured, Audacity will be using that selected audio for the next step.
[dropcap]5[/dropcap] Now, you want Audacity to remove noise not just from the selection, but from the entire length of the audio. Do this by selecting the entire waveform. An easy shortcut to select everything on a track is to click in the blank gray area just above the Solo button on the left end of the recording window:
Once you do that, the waveform will look like this (click on the image to enlarge it):
[dropcap]6[/dropcap] Now, we’ll return to the Noise Reduction effect, and this time, we’ll use the bottom half of the dialog box. Here, you’ll want to start with the numbers I have in my settings, and if that works for you, great. You might have to adjust them.
My settings in the version of Audacity I’m currently using:
Noise reduction (dB): 17
Sensitivity: 24.00
Frequency smoothing (bands): 6
Noise: Reduce (not residue – that does the reverse of what we want – very bad)
Once you have those set, click on the OK button (click on the image to enlarge it):

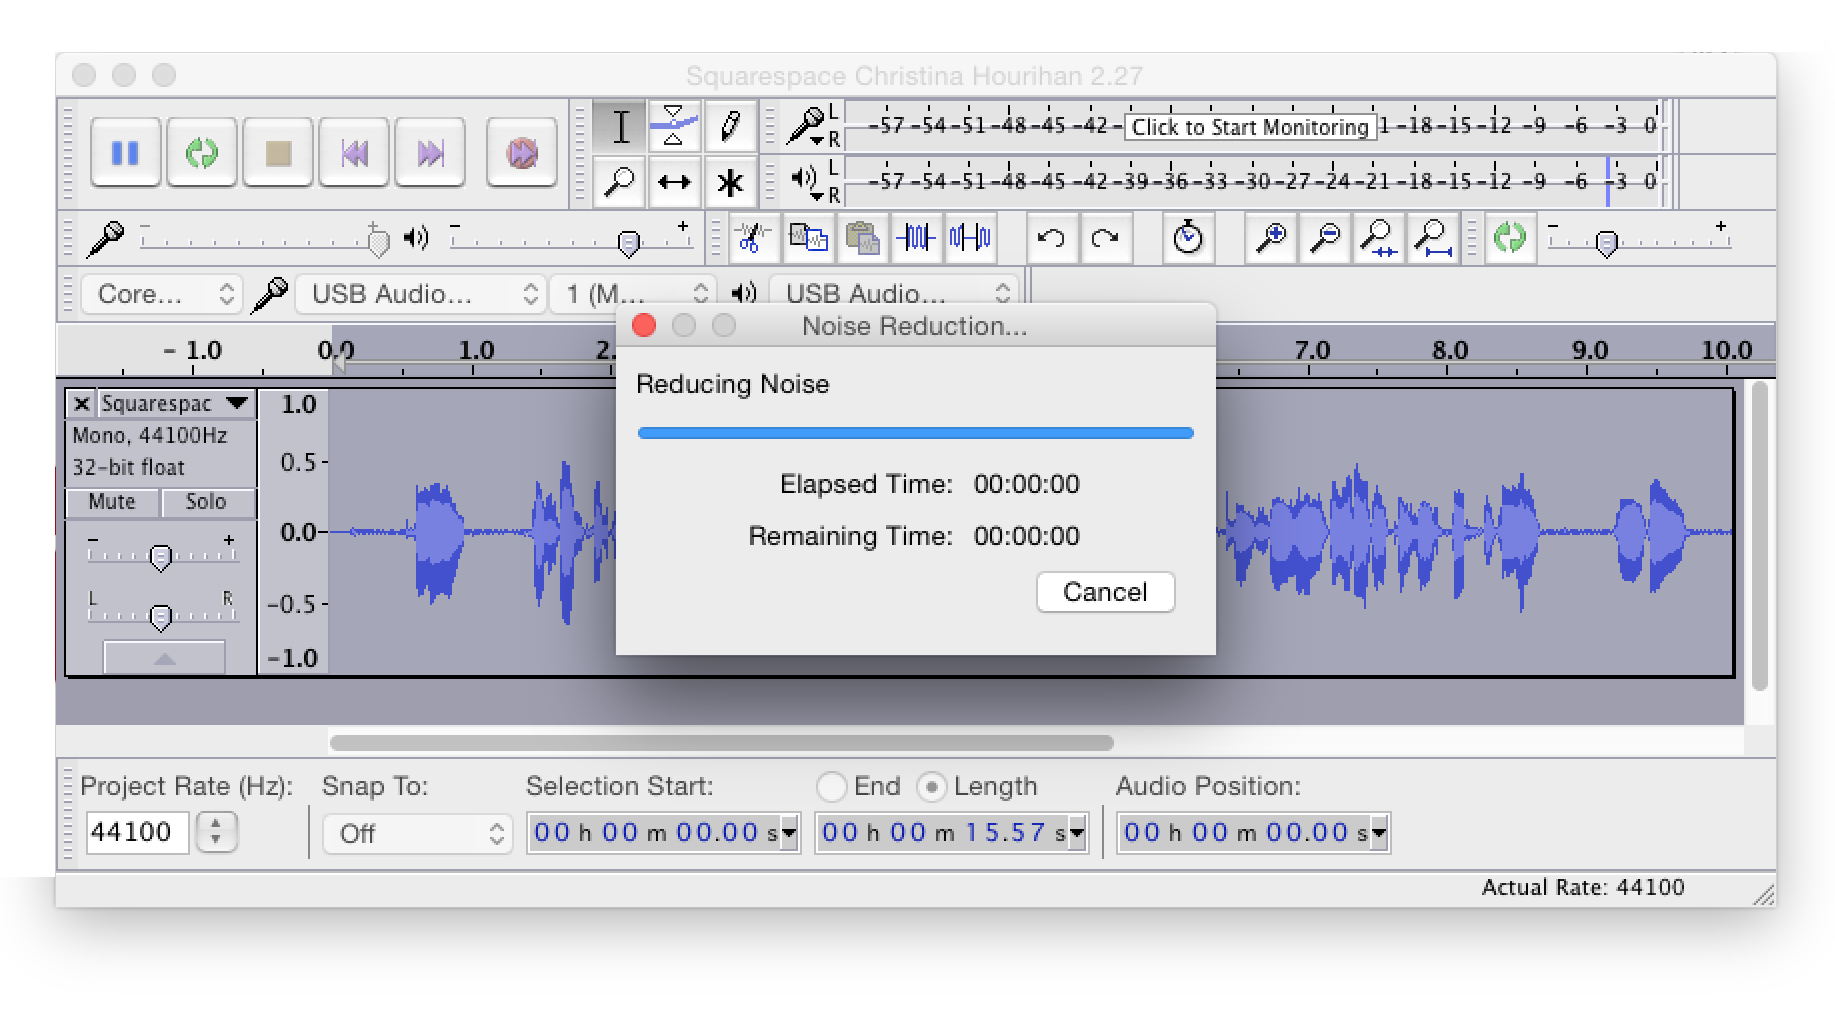
[dropcap]7[/dropcap] You’ll then watch Audacity perform the magic of noise reduction. Depending upon how long your audio is, it could happen very quickly, take a few seconds, or a few minutes for very long tracks. You’ll see a dialog box like this as it’s doing its “brown-m&m” removal (click on the image to enlarge it):
[dropcap]8[/dropcap]When Audacity completes the noise reduction process, your track should look something like this (click on the image to enlarge it):

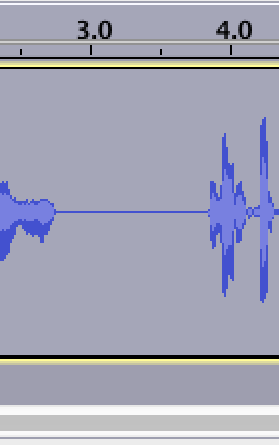
Let’s compare the before and after of that same section of the wave file we selected, as that’s where the difference is going to be heard. This is what that looked like before noise reduction:
And this is what that same section looks like after noise reduction:
And just so you don’t have to scroll up to hear it, here’s how the audio sounded before noise reduction:
And here’s what it sounds like after noise reduction:
Again, listen to the difference in room noise, and the lack of difference in Christina’s voice in both.
Make sense?
[tweet_box]An extremely dangerous article on noise reduction in Audacity[/tweet_box]
Where’s that video? I want to see this in action.
If you’re a VO2GoGo Pro, there’s a video in the VO2GoGo Labs that shows you how to do this, step by step (and if you’re not a Pro, but want to be, click here for details).
Please, don’t do this until you’ve exhausted all other avenues of reducing noise in your space. And if your audio starts sounding funky after you’ve tried this, stop immediately, and consult a doctor.
Or, if you’re a Pro, let’s do a coaching session to get you set up correctly.
Oh, and let me remind you:
FINAL WARNING: ONLY WORK ON COPIES OF YOUR ORIGINAL ***RAW*** AUDIO. DO NOT USE THIS PROCESS ON YOUR LEVELATED AND NORMALIZED AUDIO.
Hope this helps.
David
Thank you — Very well written and your attention to detail and your warnings are really appreciated. I have looked at noise reduction in the past but avoided implementation as I did not feel competent to choose levels, etc. so your settings were/are of particular interest.
Thanks again!
I used to use Adobe Audition’s Adaptive Noise Reduction. It works pretty well. But now I’ve got a nice digital compressor/limiter and a virtually silent recording space, so my noise floor is like -80dB. Much better way to reduce noise: do it before you record! 😉
Found and have used Audacity’s noise reduction in the past; however, as you stated, one must be VERY careful in how such is applied… I have wasted a lot of time readjusting the Audacity settings for noise reduction and have ruined several takes by being too heavy handed, as I have a lot of floor noise. Your settings are right on, so thanks… you’ve saved me from a plethora of headaches.
Great article David!
Great article David! Helpful that you posted your settings. 🙂
Thanks so much for this article David! I often find I need to use noise reduction because it isn’t possible to get my space as quiet as it should be but I have been struggling with the settings. Thanks for explanation and breakdown of the numbers.
I’ve been using noise reduction but your settings are golden! Thank you, what a difference that made. Before I had it at 3 6 3 and I had to do it a few times. This is great. Thank you.
This is wonderful information, David. Thanks, once again!
It would be great if you could explain what the three settings really mean: noise reduction, sensitivity, and frequency. It seems that finding out by trial and error is not the best way to understand how it works. I have spent a lot of time doing this and still cannot understand what exactly each of these setting do. Thank you.