Normalization
Hey, there!
When auditioning, giving a loud, clean sound to your submissions is essential. The level at which you safely record those auditions, being careful not to overdrive the microphone or recorded signal, can leave you with a properly recorded, but weak sounding final product. Here’s how to fix that.
Electronically, you can “turn up the volume” by using a process called normalization to tweak the audition’s overall loudness before exporting to your MP3 file for submission. Normalization is a process available in any sound editing and recording software, including ProTools and Audacity.
Here’s a before-and-after example of normalizing a piece of audio. The top graphic is as recorded, and the bottom graphic is after normalizing the audio to full 100% digital volume. To hear the difference, click on the links below the graphic.
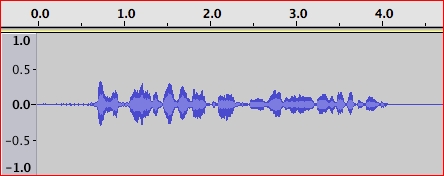
Listen to the audio as recorded
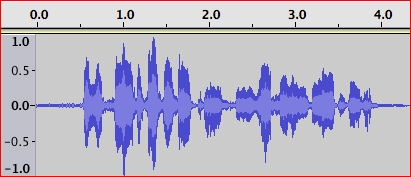
Listen to the audio with 0.0 dB normalization
Two things you’ll notice: the normalized version is louder, and the room noise is more noticeable. That’s because normalizing increases all audio evenly, by the same percentage. This means that your words will be louder, but depending upon the amount of room noise in your space, that noise may be louder as well.
You’ll find the Normalize… command under the Effect menu in Audacity. To use it, highlight the entire audition, then go to the Effect menu, and choose Normalize…. You’ll be presented with a screen that lets you choose the level of normalization, where 0.0 is the loudest, and for every full dB you choose to go down, you lower the loudness by about 8%. Audacity is usually set at -3.0 dB, and you can leave it there (-3.0 is recommended, as this is what ACX and other production companies and studios require):
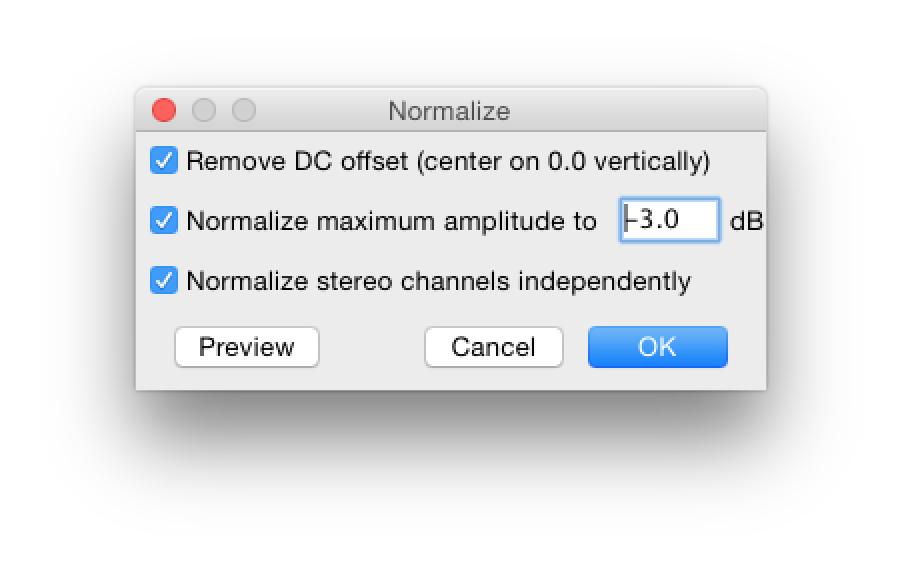
…or change that to -1.0 or 0.0. Leave the other two checkboxes (zero crossover error correction and independent stereo normalization) checked. Click OK. You’ll see your waveform increase in height. You’ve now normalized the audio, and you can continue on with exporting your work.
Do this with every audition you perform, if needed. It really does act like a simple volume control, and adds to the power and presence of your auditions.
If for some reason, normalization lowers the height of your waveforms, there’s a very good chance you’re recording at too high a level, so drop the input level down a wee bit.
If you have any questions, feel free to comment below.
Hope this helps.
David
Great article. David also told me that if you normalize and hear the sound floor, your mic input level needs to be turned up in system preferences. 🙂
Gentle correction – the term is “noise floor” – the ambient noise in the room that is also part of the overall sound that is normalized. You shouldn’t notice it much, but if your sound is softly recorded, you just might.
What about Audacity’s “Noise Removal” effect? You record a few seconds of ambient noise to get a “noise profile” that is used to set the proper level.
Noise removal has nothing to do with proper levels. That function removes, in a not so predictable way, background noise from a region, based on a sample of noise within that region. It is rarely clean and precise, rather it’s meant to be able to distinguish words spoken in a high noise level recording environment. Noise removal should never be used to enhance an audition, as there’s damage done to the overall quality of your voice and performance.
Waaaaay better than “remove noise!” As we learned, that damages the voice and is usually used to forensic analysis…. no place in VO. 🙂
Is normalization available in Garage Band? (I have not yet been able to learn to work efficiently in Audacity, but I’m very familiar with Garage Band, so I’ve been using it, and I’ve been very satisfied with it.)
I actually don’t know – I don’t use garageband ever. If anyone does know, please post.
David
Garage band auto-normalizes when you bounce the track!
GarageBand is not a professional VO tool – its features always need to be rolled back for straight VO (the auto-reverb is a great example). And automatic normalization isn’t ideal. We want control over what we do.
I’m using the AT2020 and trying to find the best input level to find a good balance of room noise vs. hot mic sibilance. I’ve been recording at .5 or 50% input but find that there is a LOT of mouth noise and sibilance after normalization and compression. Do you ever eq after all this to take that out or should I use a lower input level and then just deal with the room noise increase?
Mouth noise, I wouldn’t worry so much about. Sibilance, you can EQ with a lo-pass rolloff at between 9 and 10k – you’ll need to set your playback to loop a particularly sibilant passage, then use a parametric EQ to sweep across that space to find where your particular sibilance is, and then notch filter that particular frequency or range of frequencies down to lessen the harshness of your esses. It will also help with the same quality in your fricatives – an “f” sound is often as harsh as an “s” sound, and similar in construction and frequency range.
Hope this helps!
David
Awesome, Dave, thanks!
Can you do a post on sibilance, EQ, and lo-pass rolloff? 🙂
How about three? What would you like to hear about in particular?
Ah, yes. Team Four Star told me about normalizing audio as well. Although I didn’t know it could also be used to amplify the sound. I tend to use it when the recording peaks (gets too loud, like when I’m screaming). Looking back, I guess it makes sense that the reverse would hold true as well. Very useful, all the same.
Hi David,
Is normalization replaced by the use of levelator? Or would you recommend using them in tandem? If so, in which order?
Thanks!
My recommendation is to use one or the other – Levelator for audiobook mastering, and Normalization for other VO work. I wouldn’t use them at the same time – you’ll raise the noise floor as well as your recorded voice, and then Levelator just has to deal with that higher noise floor. Let it do its work on the raw audiobook recordings you’ve made.
A really nifty way to clean up your audio files is at a free website called Auphonic.com which essentially masters you audio. It does a wonderful job of making you sound your best.
I’ve just recently discovered that site – I’ve been meaning to do some tests and report back. Thanks for the heads up!
I use Audition, and I find it easier to boost the gain up, but I think that’s just the interface. Essentially the same thing as normalizing as long as you don’t go over 0dB.
What about breath noise?
I’m not sure what you’re asking, Teresa. What about it?
I use Sound Forge for my audiobooks, and I find the best results are normalize, then save the file and adjust the volume. This is the best way to meet my ACX specifications.
I now normalize everything-auditions, VO, audiobooks. Better quality all round.
I notice the noise floor gets way too loud, any way to increase volume without doing that during normalization?
That’s exactly what it says in the article. You have to figure out what’s causing the noise and fix that at the source. Everything, including the noise floor, gets normalized.
Is there any difference in using Audacity or Levelator to normalize, just convenience?
I was told to use “noise reduction” tool if my noise floor was above -56dB. But now I take it that is not a good idea as it damages the voice recording. Is it ever a good idea to use “noise reduction”? I sometimes have difficulty getting my home studio noise floor down to -60dB or even -56dB.
There is a huge difference in the normalization in Audacity we’re talking about above, and Levelator’s. Audacity’s normalization is PEAK normalization, and Levelator’s is RMS normalization- two very different processes. And you’ve introduced noise reduction into the conversation, which doesn’t apply to either. This article is not applicable to audiobook work, which I think is why you’re bringing the Levelator and noise reduction into the conversation. This is just about auditioning for non-audiobook work.
I love these articles. I refer to them often. Thank you!
Michelle